- Links Page
- Image Gallery
- Resistor Calc
- HomeBuilt IRDA module
- Remote Control IR
- Remote Control DIYUHF
- Remote Control DIYUHF V3
- Remote Control DIYUHF Plantraco compatible
- Battle Circuit for Heng Long Tanks
- DSO Nano review
- Power Meter Monitor
© <in der past>
Heng Long has released a new set of electronics for their tanks, the TK-RX18 (labelled as Multi-function Unit). So far, the only tank with the TK-RX18 is the Stug III, but the Pz IV and Jagdpanther will likely be available with it shortly. This new board was released in order to provide IR battling capability, and any IR capable tanks will come with it. It's possible that at some point Heng Long may release airsoft tanks with the TK-RX18 board (instead of the RX13/RX14 boards), as the rest of the functions remain the same. This would be a good thing, as the TK-RX18 should be a more reliable board.
GENERAL NOTES
CONNECTING
DBC HOME
ORDERING AND PRICE INFO
CONNECTING a DBC to a TK-RX18 board.

- Connect the DBC to the RX input using a three wire jumper cable as normal. The port is labeled "SI".
- The DBC-HL can tap "5V" power from the "IR PORT" at the pin labelled "HBU 4.5v". Either use the HBU connector harness or remove the case and solder onto the back of the pin. (redundant, the DBC already has ground from the three wire jumper -> Ground can be pulled from anywhere labelled "B-", but I'd suggest using the "HBU B-" for consistency.)
- The sound card can be fed into the TK-RX18 via the "ToAmp (input)" pin of the "VR" port. Easiest way is to shave a little insulation off the side of the wire between the plug and the volume adjuster, and solder to the side. Make sure you get a good joint (give it a tug), then tape it up.
In theory, you could feed the IR signal from a DBU/HBU to both a DBC and the TK-RX18 at the same time and battle against both TBU/DBC equipped tanks and HL-IR tanks without any changes....untested.
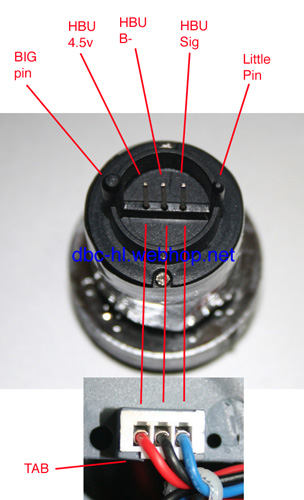
Heng Long IR SENSOR (aka HBU) pinout
The IR LED can be used as is, with minor caveats indicated below.
Here are the notes I've made on the TK-RX18 in the StugIII. Thanks to TXTanker for supplying a second RX18 for testing on.
Power system
Uses FETs instead of darlington pairs (like the TK-RX13). The tank is faster and quicker to super-spin than the TK-RX13 tanks, due to the FETs passing higher volts to the motors. Half the FETs are different than the TK-RX14 boards.
The high pitch PWM noise from the ESC seems more noticable to me, possibly due to the FETs, or a high frequency PWM drive (more efficient)
FETs are:
International Rectifier IRF7328 P-channel (8 pin SOIC)
Dual channel P-FET (2 x 7 amp FETs, used in parallel by HL), 14 amps max combined under optimal cond.
Safe region is 4A/FET, for 8A total sustained
But due to heat dissipation, probably limited to 6 amps max without additional cooling
Fairchild ISL9N310AD3 N-channel (3 pin TO252)
Very hefty FET (35A/70W sustained under optimal conditions!)
Even derated, should be good for between 10-15 amps
This board is a definite improvement over the TK-RX13 boards (which have about a 3amp sustained) and a very marginal improvement over the TK-RX14 boards (which were theoretically good for 8 amps, but probably only more like 4-5 amps without more cooling).
The TK-RX18 board had quite a bit of peak current handling, but has limited thermal cooling capability due to the small PCB size. A stock board without additional cooling is probably going to be limited in the ballpark of 6 amps or less (depends highly on ambient temperature and airflow inside the tank).
Heatsinks may help, but have to be placed cautiously to avoid impeding airflow to the board (which is the designed heatsink) and having a negative impact. Effective heatsinks could be soldered to the Flange of the N310AD and the common drain pins (5-8) of the IRF7328, but would need to be electrically isolated from each other and therefore tricky to implement.
What this board really needs is airflow. Vent holes in the case around the FETs, and a fan blowing over them (especially the IRF7328s which will likely fail first) will permit a fairly high sustained power level.
So, overall, a good improvement over the RX13s. The board can probably handle short periods of stall current or track snags. Stock tanks should be very reliable in comparison to TK-RX13 based tanks, so fewer tankers will be turned off by blowing the board as soon as the fire up the tank for the first time.
Metal tracks alone will probably be okay, though venting the RX18 might be a good idea for long runs in hot sun.
For more reliability (especially after adding weight), vent the RX18 and add a fan.
And yes, these may be conservative ratings, but I want to err on the side of caution.
Battle System
Not Tamiya/DBC compatible in stock form. It is using 38khz IR, but the signaling bitrate and bit pattern are totally different.
No weight classes or speed change with damage.
The tank fires the IR signal even without the HBU plugged in.
The hit and death motions are really cheesy.
Recoil System
Recoil motor is initially driven by the same circuit that drives the Airsoft gun on Airsoft tanks. You can blip the motor a few times (partially retracting the barrel) before the microswitch kicks in.
Microswitch on side of Main Gun
-Front Pin is to motor (negative side, normally open, completes circuit until recoil finishes)
-Middle pin is B- supply from RX18
-Rear pin is to RX18 (triggers track recoil and IR blast), also feeds power to Main Gun flash LED
You can pull the (white?) trigger wire wire from the "M.G. Fire" connector to stop the track recoil. Don't pull the whole connector or you'll dim the Main Gun flash LED a lot or entirely. You will lose the IR flash and sound effect when using the stick though (they'll stick work on the K button).
M.G. Fire socket has pins for both the stock Main Gun flash LED and the hop-up optional part #3868-006 "High-tension Flasher" , which I assume is a strobe flash for a greater flash effect. There are three pins, power, ground, and a 5v trigger signal output which gets a short pulse as long as the recoil wire from the main cannon is left plugged in.
Barrel recoil is bass-ack-wards. The motor starts driving it back until the microswitch (which doesn't get triggered until awfully far back) latches and provides power to the motor, which then drives it back all the way (triggering the flash and track recoil at the *end* of the barrel recoil). The barrel then snaps forward by spring power.
I think the barrel should snap back under spring power, and at the same time the LED should flash and the tracks recoil (if you like the track recoil), then the barrel should move forward more slowly under motor power. Hopefully this can be modded.
Heng Long has done a much better job of wiring. They actually use Red for positive and Black for negative, and other colors for switched power outputs and signals.
Wiring is neater, fewer wires just tacked on any old place.
IR LED
IR LED uses a 22 ohm resistor on the RX18 board. Can be used with DBC with 22 ohm resistor, though more range tests are needed. It's quite powerful as far as I can tell (****ty weather, so only short range tests). I used a 22 ohm inline resistor, though further range testing would indicate if dropping to a 10ohm resistor is needed (though it may burn up there) or increasing resistance is needed (if it's too powerful). The angle is too wide though...it needs a focusing tube to limit the spread...both the Tamiya LED in it's tube and the stock DBC IR LED have a narrower beam. Remember: "friendly fire....isn't"
FLASH
The cannon flash LED can be hooked directly to the DBC-RC2HL "flash" output with the stock 10 ohm inline resistor.
HBU
Now, the HBU...that's different. When hooked up to a DBC, it can battle just fine with my Tamiya Sherman. But, it cannot receive hits from my DBC-equipped PzIII except at *very* short range (1-3 ft). It appears that the HBU is only sensitive to a narrow band of IR, and the stock DBC IR LED only emits a narrow band of IR. I suspect the HBU sensor is looking for 880nm, and I know the DBC IR LED is emitting a narrow band at 940nm, with very little (< 5%) at 880nm.
Both the TBU and DBU are sensitive to a wide band of IR (so can be hit by both 880nm and 940nm LEDs), and the Tamiya and Heng Long IR LEDs appear to be wide band and cover 880nm and 940nm, though it's possible that the ranges would be different. (e.g. the range to hit a 880nm HBU would be different to hit a 940nm TBU, even if the optics were in the same condition). Unfortunately, I don't know how I could verify this, but the theory fits the symptoms.
So, for now, I don't know if I can recommend the stock HBU as a DBC sensor. It will work if you *only* battle Tamiya tanks, but I don't even know if the range is similar. There are two options though:
1. Replace the sensor inside the HBU with a DBU sensor (note the pinout is different, don't plug it into a stock HL). This means your tank will be able to take hits from anyone no matter what their configuration is.
2. Replace the IR LED in any DBC equipped tanks with a wide band LED. This means the tank will be able to hit stock HBUs...but stock HBUs will still only be hit by "wide band" DBC tanks.
I really hate compatibility issues. For now, I'd recommend sticking with the DBU, or grafting a DBU sensor into the HBU....that makes the HBU wide-band for sure.
Ideally, upgrading the sensor and upgrading the IR LED would give you guaranteed compatibility.